Transform Your Photos with AirBrush Studio: A Comprehensive Guide to Airbrush Photo Editing!
Looking to take your airbrush photo editing skills to the next level? Look no further than AirBrush Studio! If you’re a seasoned pro, this powerful tool can help you transform even the most lackluster photos into stunning works of art. In this comprehensive guide, we’ll show you everything you need to know about using AirBrush Studio to create amazing edits that will wow your friends and followers. From basic adjustments to advanced techniques, we’ve got it all covered – so let’s get started!
Benefits of Airbrush Photo Editing
There are many benefits to using airbrush photo editing software. Airbrush photo editing can transform boring or lackluster photos into beautiful, high-quality images that look professional and unique. With a little know-how and the right tools, you can achieve stunning results with minimal effort.
Airbrush photo editing is a great way to add some excitement and life to your photos. By using the tools, you can create a more dynamic image that stands out from the norm. You can also change the color of objects in your photo, giving it a new look that is all your own.
Airbrush photo editing is also versatile. You can use it to fix any inaccuracies in your photos or to add special effects like fog or snow. There are no limits to what you can create with airbrush photo editing software!
How to Use Airbrush Studio
Airbrush Studio is a photo editing tool that allows users to add effects like airbrush painting, watercolor, and chalkboard to their photos. This comprehensive guide will teach you how to use Airbrush Studio and give you tips for creating the perfect photo edits.
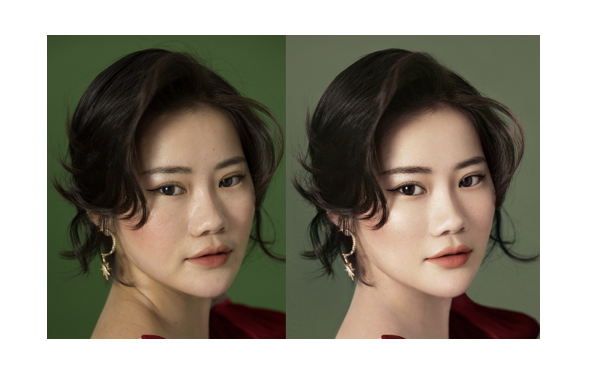
If you’re looking for an all-in-one portrait editing product, Airbrush Studio is definitely worth considering. But how to use it? First, download and install the software on your computer. Then open it up and import your photo into the program. You’ll notice a range of tools available to you in the left-hand toolbar, including skin smoothing, blemish removal, eye brightening and teeth whitening – just to name a few! Simply select the tool you want to use and start adjusting accordingly. The interface is designed with ease-of-use in mind so even if you don’t have extensive experience with professional-grade editing software, Airbrush Studio should be very intuitive once you get started. Don’t forget to save your changes before exporting or printing your final result! Overall, using Airbrush Studio can help transform ordinary portraits into stunning works of art – so why not give it a try today?
Conclusion
Airbrush photo editing can add a level of sophistication and pizzazz to any photo, making it the perfect tool for enhancing portraits, creating striking abstracts, or adding a touch of magic to your everyday shots. In this comprehensive guide, we will teach you everything you need to know about using AirBrush Studio to edit your photos. From basic tips on how to use the program interface to more advanced techniques for manipulating colors and tones, we cover it all! So whether you are just getting started with airbrush photo editing or have been using it for years, this guide is sure to help you take your work to the next level. Thank you for reading